Sunday, 8 May 2016

Chimera Conversion part 4 - Finished!

So I think I am finally happy with the Chimera.  The only steps that were left were to finalise the track work and add some minor 'dirt wear' to the bottom portion and the track sides.  So here it is, any feedback is most welcome, bear in mind it was my first go at doing major weathering!


Sunday, 1 May 2016

Painting Gold

So painting gold is hard...really hard.  I have talked in another post about how I do small areas (chest plates, decorations etc) but when you want to do a whole mini that system breaks down.

I have to say, I can claim no responsibility for this way of painting gold...its pinched from someone else. Big props to Kenny Boucher at Next Level Painting for his guide, which I have modified to work with brushes not an airbrush.

So I used to have a metal Dante figure. I didn't really paint him that well, and the years have not been kind to him: 

Sad Dante

That horrible yellow-gold colour was achieved with a bright gold followed by a flesh wash (don't ask me how I remember the technique from over 20 years ago!). I don't really like that look, and I want my Dante to look like he's wearing some ancient aged brass armour. Kenny's method does this well, with a little modification.

So first things first, I stripped him off in Dettol. Then reattached his gun arm. The axe was problematic as it had snapped in the mid shaft. Basically I filed both ends off, drilled a 0.8mm hole in the dead centre of either end (with a pin vice) and then pinned it with a cut paperclip (my favourite pinning trick). I then pinned his foot onto a nice resin base I had lying around: 

Also primed in black

It turns out that the old metal sculps are a bit lacking on the detail front, and dont have the same depth of features as resin or plastic. This meant painstakingly hand painting in the details like abdomimal musculature to enhance their depth. Painful. 

So the next step was to paint the miniature in a bright silver (I used Runefang Steel) and apply a coat of Vallejo Model Air Copper (with a brush). In this context Copper is going to act as a 'dark gold', and the silver Base coat is to provide a really bright starting point.


The next step is to drybrush (quite liberally) Vallejo Model Air Bright Brass. As you can see I quite like these Vallejo metallics, and it was Kenny's tutorials that really turned me on to them. They are designed for airbrush, so are beautifully thinned and have great depth of coverage and pigment density. Another thing you will notice is that I never actually use a gold paint whilst painting this gold...


Next up is to try and increase the depth of darker tones, and this is done with a very delicate series of washes. The GW washes are ace, and carefully going from Seraphim Sepia to Agrax Earthshade and then down to Nuln oil gives an amazing result.  I then did a light drybrush of Bright Brass to re-establish the high tones.


The next step was the most important I think, and that is to reinforce the deeper tones with a very thin almost wash of burnt umber (vallejo model air range is my favourite...again). You need to be precise, it's almost like painting a very fine lowlight into the recesses. This took a while and a whole bunch of practice going up and down in tones until I reached this stage: 


Now clearly I have also painted some other details on at this stage as well. I have tried to keep a full on gold look, with as much variety of gold tones as possible (for practice as much as anything). I decided not to go with the white wings look, I don't think it matches the rest of my force.

So there it is, he still needs the finishing touches put on but is basically finished. I really enjoyed painting the gold tones, but it was much more time consuming than I had figured. Maybe down the line I will get some sanguinary guardsman...who knows.


Saturday, 30 April 2016

Chimera Conversion part 3

So I made a few changes since the last post! As I was putting the details on, I found that I didn't like the arrangement of the stowage...so I jigged it about a bit. I moved the bed roll that was on the turret side down onto the hull, added an ammo box for the heavy stubber, and put a spare track set up on the turret. 

I also started to put the finishing touches onto the non-paintwork areas. The tracks on the turret are supposed to look really rusted  (there's no wear on them to keep them shiny). I got to this stage by basing in black, then a wet brush coat on Rhinox Hide, followed by progressively lighter mixes of Rhinox and Skrag Brown stippled on (each shade lighter having a bit less coverage). I then put the final shades on mixing in some Ryza Rust. I then put on a splattering of Typhus Corrosion, being sure not to obliterate any of the earlier stages.


The tracks have followed the same technique, except they need to get a drybrush of a dark silver over the areas that will have wear. This is tricky, the first time I did it I ended up having to start over as the metal was too heavy, and I couldn't save it with creative washes.


Smaller rusty areas like the ammo box and shovel were done slightly differently. Firstly I painted them up silver, and washed with Nuln oil.  Then I dabbed on some Typhus Corrosion around the edges and let it dry. I then built up those rusted areas with the Rhinox hide/Skrag Brown mix, and finished off with Ryza Rust. Lastly I washed the whole lot with Agrax Earthshade. I did cheat a bit and put back on the tiniest bit of Ryza after the wash had dried...just for some more depth. I reckon it's pretty convincing, and looked a lot like my reference pictures:


I also put some colour on the heraldry, I thought it looked a bit boring in plain silver. In essence, I wanted them to look like aged brass. To do this I painted them silver, and washed down with Nuln oil. I then did a really rough brass highlight (I like Vallejo model air Bright Brass....it take a lot of mixing, bit goes on soo nicely), being sure to keep silver in a bunch of areas. I didn't want to shell out for the GW technical paint to make the verdigris (it's such a small amount!) so I made my own...I put Warpstone Glow with Lothern Blue in an 20:80 mix, and then added water until it was really very thin indeed. I splashed some of it around in the recesses (it behaves like a wash) and the effect is pretty cool!


There's just a few final flourishes left now to finish the model in time for the next competition, the tracks being the most time consuming of those. I hope you guys like it so far and are finding it useful to see some of these techniques...I'm just experimenting and finding out what works for me at the same time!


Sunday, 24 April 2016

Chimera Conversion part 2

So this is how I left the Chimera after building, basecoating and drybrushing it up:


Meets the three colour criteria for tournaments and everything! But I wanted to add some fluff to mine; I wanted it to look like it had been stolen from the PDF, whitewashed and then allowed to fall into disrepair. I used a couple of interesting (and new to me) techniques for this...All learnt from other tutorials around the Internet.

The first step was to get some of the heavy weathering to the whitewash done. For this I elected to use a hairspray chipping technique. This has been around for years and years, but is summarised really nicely in the Andys Hobby Headquarters YouTube channel. 

In essence the process is to seal coat the model to protect the underlying paintwork (I used GW purity seal, it gives a nice satin finish). Then a couple of heavy coats of hairspray are applied and left to dry.  The next step is to apply the coat that you want to weather. Here I wanted to put a whitewash coat on, and make it look like it had worn through. The best way to do this is with an airbrush, but I don't have one. Instead I used Montana Gold - Marble, and applied it using a zenithal lighting type pattern.


Here was mistake number one. The Montana Gold sprays do not go on as smoothly as the GW ones I am used to...and I didn't test out first! The finish is speckly around the edges, and to get anything smooth on the top I have had to put the spray on too thick (not damaging the details, but a bit too much for hairspray weathering). I would only recommend Montana Gold for basecoating or as a primer, don't try and do clever transitions with it.

The next step was harder than it needed to be as a result. Taking a toothbrush and some water I basically scraped off the overlying white paint. The thinner the overcoat, the less effort you will need to put in, obviously this is important if you have lots of delicate details on the mini.


I wanted more depth to the weathering than this, so I left it all to dry off properly and then started again: another two coats of hairspray followed by a (much lighter) white coat, and then the brush.  You can repeat these steps as often as you like until you get the weathering you are happy with. Remember to do another sealcoat at this stage! Here is where I decided to stop:


So that looks ok, but I was never happy with it since I over applied the first whitewash. I decided to try and make the save with some creative washing. I basically put a dirty horrible wash of Nuln Oil and Drakenhoff Nightshade on.  I did this by having both pots open and dipping randomly into each (so the mix was never the same twice). I then got some onto the model, trying to both filter the main panels and get into the crevices, mushed it around a bunch and then dabbed some off with tissues/fingers. That doesn't sound terribly scientific, and it wasn't, but I managed to experiment a bit and get an effect I was really happy with:


Next step was to apply a pin wash with the Nuln Oil to encourage some depth around the details.
I started to put some grime on now, designed to look like the bolts and scratches have rusted and then the rust has streaked down the paintwork. I did this with a sepia wash, very carefully applied in the areas where rust would run, so dripping down vertical panels, but pooling on flat ones. The overall effect is pretty convincing I reckon!


So I think thats the paintwork pretty much done for now. The details are all that's left to make this a finished project...and I will cover those in a future post where there will be some experimenting with tank treads and rusting techniques! Thanks for reading!

Saturday, 16 April 2016

Competition Entries

Loads of people say that entering a competitive painting event is a good way to improve your skills....so that's what I did!
This was my entry for the local Konversion Kompetition, where I placed a respectable 4th:


Here is entry for the local Battle of the Brush competition. It is a Librarian Turmiel which I have removed the Dark Angel icons from and painted in a scheme to match my Blood Angels. I really like the model, it's a great sculpt and I like the pose. This was my first go at glazing, you can see that the cape is a bit rough around the transitions, but it still looks pretty cool. I also glazed the patterns on the force sword...I'm not sure I am totally happy with the way they came out, but they demonstrate the technique really well.


Either way, it was good enough to win 1st place! Hopefully more competitions to come, I may submit my converted chimera to something soon if the paint job comes out ok. Thanks for reading...I hope to be better at posting more regularly from now on!

Chimera Conversion

So Deathwatch Overkill came out and I picked up all of the genestealer cult models from ebay. I've loved the fluff for the cult since I was a kid; with the exception of the hideous genestealer limousine. So cue the next project: a looted chimera for the cult. The idea is that it was the pride of the local pdf until it was stolen and whitewashed. Now its falling apart.

There are a bunch of cool chimera conversions online, but I decided to go with a home brew process pinched from the back 40k. I like the set back turret look, and this was challenging to build (my first go with greenstuff). I won't go through the conversion steps, the back 40k has a huge tutorial spread over three blog posts...I will just show you how mine turned out with one WIP shot:


The barrel on the side was interesting, if only because it required some creative chopping to get it to sit flush:


I always find it a bit hard to see what something looks like when there's loads of different mediums on it, so here's one of the tank with the primer on:


I stuck with a flamer turret, partly because I really don't like the laser gun turret look, but also I feel like this tank would be deploying the cult in close quarters, so the flamer would be a high impact weapon for them.

The next step in the painting scheme is to preshade the model before the whitewash coats go on. In this case I wanted the tanks base colour to be a grey, urban camo type affair. It quite simply is drybrushed up from black to a light grey...This is probably better done with an airbrush, but i dont have one. I also put on the purple company stripe (which happily goes well with a genestealer cult theme!:


Thursday, 24 December 2015

Update works in progress

So I haven't had much time to write anything lately, or do any painting! I thought I'd just share a few photos of my current works in progress...

First up is my Predator; getting a weathering job done now. I'm pretty pleased with how it has come out...For my first vehicle! I am planning to seal coat it when the weather improves and then play with some weathering pigments to finish the job.

Next is my tactical squad captain...coming along slowly. I dread to think how long the whole squad will take! The most obvious defect is the cloth. I had one go and hated the effect so I'm going to repaint it and then have a go with some glazing.


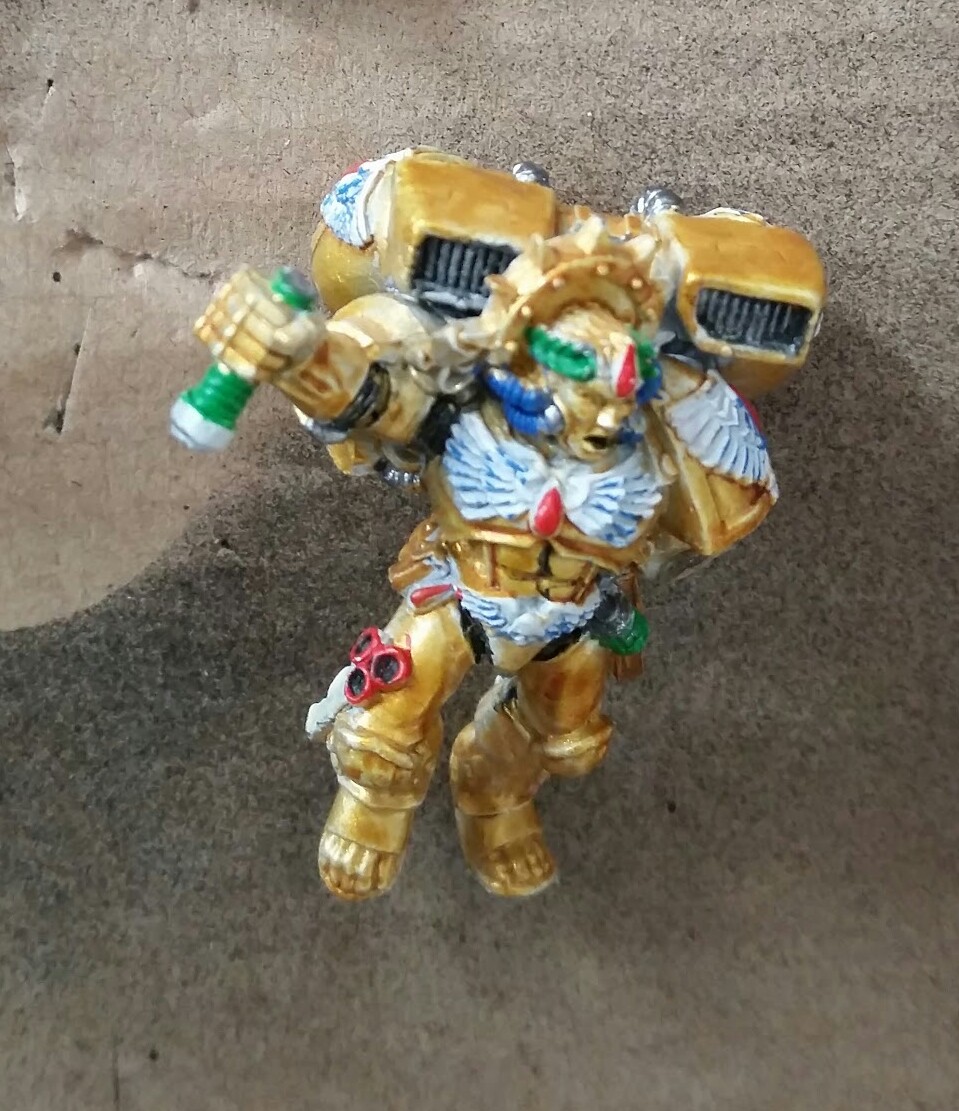
Lastly is my Dante salvage figure. I will put a post on in a bit with how he got from this:


To this:


I'm really pleased with how the gold is looking, after a lot of going back and forth. I just need to finish up with the base and do a couple of final flourishes and he will be done.

Oh and here are a couple of warriors I am doing too...busy times!